Managing the Hatcher Environment
By, Tommy Lively, Hatchery Specialist, World Technical Support, Cobb-Vantress
Even though the hatcher period makes up only 14 percent of total incubation time, this period has a significant impact on chick quality. Since chick quality has an impact on broiler performance, providing an optimal hatcher environment (temperature, humidity and ventilation) will ensure high quality chicks that can reach their full genetic potential.
Hatcher Temperature
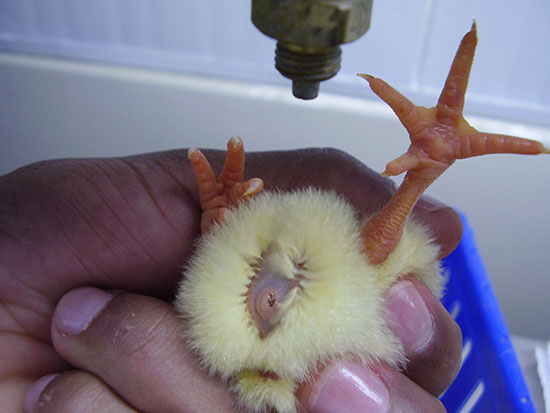
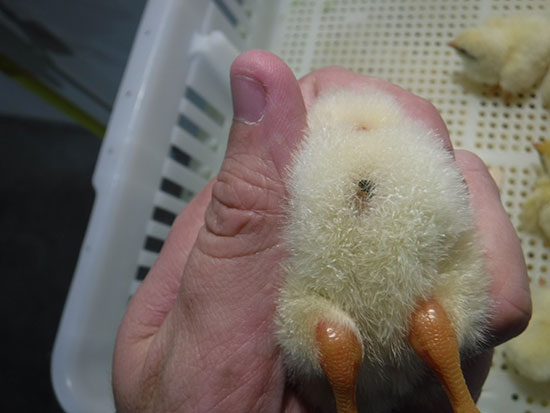
Overheating in the 24 hours post-transfer to the hatcher will lead to an early hatch, large navel buttons (Image 1), dehydrated chicks, and high 7-day mortality. In contrast, hatcher temperatures which are too cool in the same period post-transfer can cause chick quality issues including small navel buttons (Image 2), an extended or long hatching window (time from first chick hatch to final chick), and in extreme cases reduced hatch associated with increased alive or dead pips.

Image 1. Large Navel (High Temperature)

Image 2. Small Navel (Low Temperature)
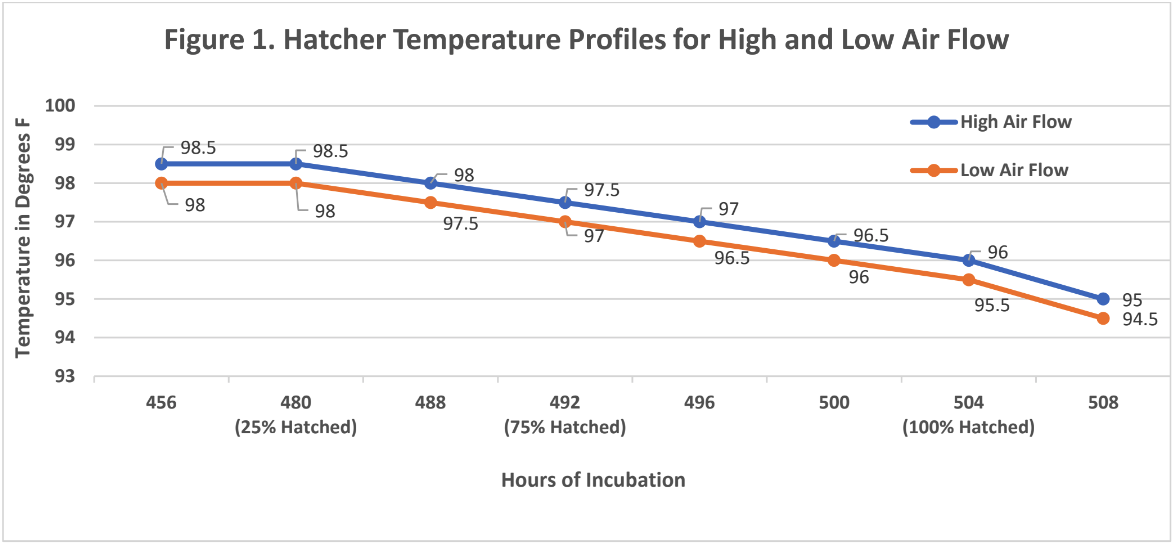
As chicks begin to emerge from the shell, the temperature in the hatcher must be gradually lowered to prevent overheating and dehydration of the newly hatched chicks. In even the best scenario, the hatch window in commercial operations will be at least 24 hours, and though the goal of every hatchery manager is to pull the chicks as soon as they are ready, in reality this is rare. Instead, chicks are normally held in the hatchers for several hours after they are ready to pull. During this holding period, the temperature in the machine must be lowered consistently (Figure 1) to control cloacal temperatures to the proper range of 104.0 to 105.0°F (40.0 to 40.6°C).

Figure 1 shows two possible scenarios for hatcher profiles. The higher profile should be used for machines with high airflow within the hatcher cabinet. The cooler profile is for machines with lower air speeds. Almost all hatchers, regardless of manufacturer, fall into the range of 98 to 98.5°F (36.7 to 36.9°C) at transfer, with only the oldest machines with very poor air flow requiring a temperature below 98°F (36.7°C). The x-axis of the graph in hours of incubation includes notes referring to the percentage of chicks hatched at 480, 492, and 504 hours of incubation. If the hatch window is advanced (75% hatch at 488 hours instead of 492), the temperature is too high, and the profile should be shifted forward by a corresponding 4 hours. Conversely, if the hatch window is later, adjust the profile accordingly by delaying a temperature decrease. Other factors such as how narrow or wide the hatch window or the total hatch percentage will also impact the timing of the hatcher temperature curve. It is important to remember that the strategy behind managing the hatcher profile is to prevent hatched chicks from getting too hot. The profile is not designed to cool chicks after overheating.
Humidity in the Hatcher
It is impossible to correct moisture loss in the hatcher if it is not properly achieved in the setter, because adequate humidity must be maintained in the hatcher after transfer. Moisture is necessary during the hatching process so that the shell membranes remain soft and pliable allowing the chick to easily escape the shell. At extremes, a low relative humidity (RH) in the hatcher can delay the hatch widow and, in some studies, has been correlated with higher 7 day mortalities, while a very high RH may lead to increased incidences of exposed viscera. Adequate humidity will also prevent the yolk sac from drying too quickly, preventing strings or wicks from the navel.
The first 24 hours after transfer, the relative humidity should be approximately 52 to 54%. When pipping starts, the moisture level will rise causing the wet bulb temperature and absolute humidity to rise as well. After the majority of the chicks have hatched (around 75% of the total hatch), the absolute humidity will decrease back to the set point of the machine, however the relative humidity should remain constant as the temperature profile is lowered. This will require lowering the wet bulb setting along with the temperature setting to maintain a constant relative humidity and avoid raising the heat index on the newly hatched chicks.
Hatcher Ventilation
While temperature and humidity are crucial to maintaining the hatcher environment, proper air exchange is also critical. Proper hatcher ventilation can only be achieved by having the correct conditions in the plenum supplying air to the machines. At transfer the goal is to have enough temperature and humidity in the intake plenum to allow the hatcher damper to open quickly. Later as the temperature of the machine is lowered, the plenum temperature may need to be lowered as well to allow the machines to cool. However, enough temperature must be maintained in the plenum to achieve proper damper openings. Twenty four hours before pull or when approximately 25% of the chicks have hatched the hatcher damper should be at least 25% open. When 50% of the chicks have hatched around 18 hours before pull, the damper should be at least 50% open, and the last 12 hours before pull the damper should be 100% open.
Key Points
- If the hatcher is too hot or too cool, chick quality issues including navel issues, dehydration, or an extended hatch window can occur.
- Temperature in the hatcher should be reduced gradually according to the number of hatched chicks, hours of incubation and air flow in the hatcher.
- The relative humidity in the hatcher should remain constant (52 to 54%) and as the temperature profile is lowered which will require adjusting the wet bulb temperature.
- Proper ventilation through the hatcher require correct temperature and humidity in the intake plenum.
